14 January 2010

Poo pots and the press

I'm beginning to get the itch to plant. Luckily, in another month or so, it will be time to plant seeds indoors to get a head start of the Chicago spring.

Couple of things to consider -- first is when to plant. Most seed packets will give instructions on when to plant inside based on the approximate last frost date. I checked with the National Climate Data Center for my area, and I'm going with the date of May 10th. (The data shows dates for each location in three categories -- 90% chance of frost after that date, 50% chance, and 10% chance. I'm going with the 50% because I'm antsy.) So if a seed packet suggests planting indoors six weeks before the last frost date, then I will plant those seeds on or around March 29.

Next thing to consider is in what to plant. I use poo pots usually -- dried compressed cow manure made into cute little pots. No smell (there's never a smell from manure after
it's been dried and aged), no muss, but slightly more than I want to spend this year. On the cowpots.com site, 12 3" pots are $6.99 plus shipping. They're great pots, since you can just gently remove the bottoms and plant your seedlings with the pot right into the ground. The poo pot will decompose, adding amendments to the soil, and the seedling won't have transplant stress.

This year I'm pressed for cash, and what cash I do have I will spend on soil and seeds (more on this later).

The answer then is newspaper pots. I've got a lot of newspaper lying around (even though the Sunday Chicago Trib is terribly puny) because we just started getting the Sunday NYT (thank you, newspaper gods). And so the girls and I will be making newspaper pots.

Newspaper pots are good for starting seeds for a bunch o' reasons.
  1. Even though it's good to recycle, it's even better to reuse.
  2. Newspaper will decompose rather quickly, adding some nutrients to your soil.
  3. Some plants don't like being transplanted, and they don't like their roots being handled. Because you can plant newspaper pots right into the ground, the stress is minimized.
Check out this video for a quick tutorial on one way to make paper pots. Keep in mind -- these chicks use tape, which doesn't decompose. I'll be looking for another method of keeping the paper together later.

06 January 2010

Drooling in 2010


Life got hectic in the second half of 2009, although I can't put my finger on why.

Been dreaming some bigger dreams, still a really fat baby.


Drooling over these herb stands and wondering if I can justify getting one even though I'm overflowing with small white pots.

03 June 2009

Drool-worthy, on many levels

I crave cool ways to get the boring accomplished. Storing rainwater. Drying clothes. They don't need to be handled in an interesting way, but sheesh, can't a stay at home mom get a little enjoyment for herself?

My sister-in-law, who may be laughing at, not with me, most of the time, sent me a link to H365 to jazz my life up a little, and for that I'm extremely grateful.

H365 took two easy, somewhat boring essentials and coated them with style.

The RC-1 Rain Collector is a gorgeous piece of rainwater harvesting equipment. I currently have two big black recycled plastic barrels in my backyard, dutifully storing rain water. I know there are some prettier models out there -- even locally at Lurvey's -- but I don't throw away what works perfectly fine just because it ain't the prettiest thing out there.

However. I have several other downspouts looking for a harvesting mate, and once this pretty goes on sale, I am first in line. I love that it's white, mod, and high enough off the ground to make filling the accompanying watering can without too much stooping. According to the website, the RC-1 holds 45 gallons of the most chic rainwater in town.

Just for fun -- here's the DR-1 Drying Rack, which strolls flat and fashionable around your pad until you need an arm for support.

07 May 2009

I am what I am

Got a question about the title of the blog, Really Fat Babies. When we renovated our house in 2007, I took a ton of pictures and posted them at smugmug so the family could see what we were up to. One week, a lot happened but I couldn't see it behind big hanging plastic, so I substituted a picture of the babies instead (of course, they weren't babies by that point, but I love the series of baby pictures of the two of them).

In case you can't tell, the baby on the left is my nephew August. This is August now.


The baby on the right is my daughter Katie. This is Katie now.


They were pretty fat way back when.

Anyway, I really liked the title Really Fat Babies, because I am one. Fat because of the stuff I've got, and the litter I create, and Baby because of my total lack of understanding cause and effect, at least until a few years ago. Duh, we create waste, and duh, it needs a place to go. And complete Duh, we could create a lot less waste and find a better place & use for it to go.

I wasn't planning to blog until I spoke with a teacher at my daughters' school, and she mentioned vermicomposting and the desire to use it in her classroom. Hasn't happened, and probably won't, since the principal thinks it would unleash a bacterial war in the building (whahat?). But I thought it would be a good idea to blog about my attempt at it, maybe to help her out, mostly because I like writing.

So here I am. A Really Fat Baby.

Fresh is always good, but frozen...

When even the NYT is telling you how to preserve the food you buy/grow, it's time to get going. I'd like to say the reason I don't freeze more stuff is that I buy a lot of frozen stuff, my freezer isn't that big, and I'm afraid of freezer burn.

I did freeze some produce last year -- blueberries from the farmers market, shredded zucchini from my garden. And then I didn't use it -- any of it. Hmmm.

06 May 2009

Faux Terra Cotta Composter

My husband's natural inclination, upon seeing the utilitarian black, heavy plastic items I bring home, is to turn up his aristocratic nose (can an Irish nose be aristocratic? Someone enlighten me!). I don't blame him -- my first composter was big, black and industrial-looking. My second was big and industrial, although it was green. And my current composters -- outdoors and vermi -- are, again, big and black and plastic. Ditto for my rain barrels, which he will not allow in the front of the house, or anywhere anyone but me can see them.

While this doesn't bother me a bit, I do see his point about aesthetics. It would be nice -- not necessary, but nice -- if my composters and rain barrels added to the general decor, rather than subtracting from it. This wouldn't mean I'd get rid of the big, black plastic I've got -- just that I'd be allowed to showcase somewhere other than the basement.

Enter Algreen Products. This has to be the nicest looking composter out there (aside from those delicious pots from Daily Dump in India).

I'm not sure how well this composter works -- it isn't open on the bottom (how will beneficial insects get in?), I'm not sure how big the door is for retrieving compost, and it looks pretty small.

However, on the plus side, it's got a storage area at the bottom with a spout for removing compost tea. That's really cool. Although again, how will beneficial insects help the decompostition?

Ah well, it's lovely. They've even got a matching rain barrel, with room for plants on top instead of a cover. Ahhhhhhh.

12 April 2009

Wedge Worldwide Co-op

One of my favorite online resources for gifts is Wedge Worldwide Co-op. The Wedge Co-op is a natural foods store in Minneapolis, but they also run an online store with eco-friendly gifts from around the world. (Hold the locavore arguments for a moment -- I have no rebuttal except to showcase the beauty of what WW offers.)

My favorite gift to give -- the footed teacups from Japan. My second favorite -- the Happy Monkey setting for kids (or my brother).

And now they're selling vermicomposters! Can it get any better?

Yes -- because even Crate and Barrel is selling kitchen food waste containers. If people can find outdoor composting bins easily online -- and in some local plant nurseries -- and indoor collection bins easily, what's stopping the compost revolution?

11 April 2009

Not what my husband thinks it is


As much as I love my kitchen waste collection bin, it just can't beat what Daily Dump came up with.

Daily Dump is a group based in India with the goals of helping homeowners handle their organic waste in an earth-friendly way.

Daily Dump sells gorgeous pottery composters, some of which are pictured here, and they also offer services to help homeowners who are new to composting. Services include set-up, demonstration, pot painting, monthly or weekly maintenance including sieving of finished compost, and crisis visits.

Daily Dump will also buy back any pottery composter, if a homeowner decides to stop using it, and will also buy excess compost, if a homeowner doesn't need it all.

I'm flabbergasted. And excited. And disappointed these composters are only sold in India.

How is it in that in the US, indoor composters look like this:


And in India, they look like this: (people not included)

Um, storage?


The first question I'm usually asked about composting is about the smell. Smell in the outdoor bin, smell in whatever storage container I use to collect scraps in the kitchen.

As to the outdoor bin, there is no smell (aside from the clean, fresh smell of earth) if the mix is good with green and brown waste and moisture. [If there's a noticeable odor, then it's possible the green waste outweighs the brown, or the bin is too wet -- in either case, add more brown waste in the form of dried leaves, shredded newspaper, etc.]

And as to the indoor bin... well, there might be a little odor. Some indoor collection bins are airtight to contain any odor, but the airtightness means no moisture evaporates, leaving the bin more than willing to grow mold. Most of these types of collection bins include replaceable carbon filters to handle the odor that results.

I'm encouraged that The Container Store now sells waste bins specifically for holding kitchen waste on its way to the composter. The store offers two good-looking bins -- see the bamboo bin above. Both are airtight with carbon filters.

I use a somewhat less counter-friendly bin that's aerated on all sides, so mold is much less of an issue. I keep the bin under my sink, and frankly, if I smell any odor when I open it, that reminds me it's probably time to empty it, either in the outdoor bin or in the worm bin.

Spring has [finally] sprung

I love composting. I love that the state of Illinois is closer to allowing commercial composting (approved by the IL Senate; awaiting vote in the House). I love even more that Chicago's bid for 2016 includes the assumption of in-state commercial composting as well as the facilities to provide it.

That's all big stuff -- changing laws, handling Olympic waste. What I love even more about composting is what each of us can accomplish. I haven't posted recently about the worms -- and I will, in more detail -- but this is my favorite time of year, for the gardening, for March Madness, and for the annual audit of my compost bins.

Each year, I pick up my outdoor bins to see what I've got inside. I usually stop adding to the outdoor bins around the first snow of the autumn prior, and I let the bins sit through the winter. Come spring, I need to fill up my raised beds, and what better to use than the compost I've been creating since the year before?

Usually what I find in a bin around this time of year is a mush of indecipherable brown and green waste on top, with some lovely compost underneath. After I pull off the bin, I push over the top, partially-composted material onto a plastic sheet, scoop up the mostly-composted material into the wheelbarrow, and then put the bin back into its spot.

Sometimes I use the partially-composted material in the bottom of a raised bed, with the mostly-composted on top, depending on the level of decomposition. Sometimes I just put the partially-composted material back into the bin, as a starter for the coming composting season. This material already has the bacteria and critters to help the compost along, so it's a terrific starter material for new batches of waste.

It's a great feeling. I'm spending less money purchasing compost elsewhere (and yes, I purchase compost elsewhere -- I use the stuff everywhere and couldn't possibly generate enough organic trash in enough bins to cover all of my needs each spring). I'm cutting down on the garbage our family puts into landfills, and I'm removing any odors that might linger in our trash can area, both in the house and in the garage.

02 March 2009

Green or Gross

Funny video on HuffPost, showing two worm bins side by side and giving a little critique of the differences.

I gleaned some good advice -- looks like I'm putting too much food in. You shouldn't put food in the next highest level until it's all eaten in the current working level, but I've got food to spare and it's in the higher levels. What this means is that the food will sit around longer and get a little grosser before the worms are ready to come up and eat it.

What this also means is that I either need more worms... or another bin. Who's going to tell Pete?

27 February 2009

Independent verification! ... almost

I love CleanAirGardening. The whole idea behind it -- a guy too cheap to buy a gas mower finding his eureka with a push reel mower -- tickles me. (I was inspired and now am the proud owner of a Scotts push reel mower, although sometimes I run out of inspiration to mow by July and Pete claims it doesn't really cut the lawn anyway.)

Now I'm perusing the wonderful website this morning and what do I find in the worm bin entry? Independent verification that vermicomposters can handle pet poop. Whew. The Book doesn't discuss much beyond cat and dog waste, but CleanAirGardening has a whole discussion about what can and can't be handled. Yahoo! [in a non-trademarked, completely spontaneous use of the word]

From CleanAirGardening, in the [Can-O-Worms] round composter description:
Can this bin handle Pet Droppings? Yes - worms will eat pet poop if there is no other food available. If you want to compost pet waste, you should not put any food scraps in the bin along with the droppings. When composting pet poop, you'll need a dedicated worm bin that contains only poo. The worms will avoid the pet waste if another food source is available, and the waste is likely to contain pathogens that can pose a health risk over time.

Some pet droppings should never be composted. These include kitty litter, pig waste, and bird droppings. Kitty litter is not biodegradable and can kill compost worms. The other types of waste are too likely to contain pathogens and are not worth the risk to compost.

Worms make short work of dog droppings, but they can also handle ferret and cat droppings if the waste is not mixed with gravel. Other animal waste that can be composted includes droppings from rabbits, hedgehogs, prairie dogs, chinchillas, and a few other pets. Animal waste from pure herbivores doesn't require a pet waste composter though - this waste is pathogen free and can be used as an activator for compost piles or compost bins.
Now, cavy droppings are not specifically mentioned, but if rabbit poop is a viable compost component, then the cavy waste should be as well -- they eat very similar food, they're both herbivores, the resultant waste is really small (and really numerous).

Basically, what I get from Lar's description (he's the guy who was too cheap to buy a gas mower), is that I can either put the used bedding/poop from the cages into the vermicomposter as the brown material (OK, pun intended). Or I can put it into my bin outside -- which I also do.

Whew. I actually used the used bedding/poop directly in my garden, using the material as the bottom level of "soil" in the raised beds I built last year. The vegetables and companion plants grew gangbusters.

Another reason to love CleanAirGardening -- it's enabling my reuse of cavy poop.


25 February 2009

More to read

The Chicago Tribune had a small piece about vermicomposting in their Sunday SMART section.

(Pause a moment to hate on the new layout and structure of the Chicago Tribune. Where, oh where, did the newspaper go?)

I don't generally like the section, but it was a cute article about a woman who hosts worm parties. Sometimes it's a wine and worm party. Attend at your own risk.

Temperature

Got a question about location and temperature from a friend. She wants a worm bin; her husband/significant other most emphatically does not want a worm bin; she's decided to get a worm bin anyway. (Ah, this feels familiar.)

The question is: where to hide it? I suggested her huge pantry, envying that she has one (I don't). Apparently, the husband/worm deny-er goes in there too -- who knew? So she's thinking laundry room, which is in her basement.

My bin is in my laundry room, which is in my basement, but we've got different situations. My basement is an English walk-out, meaning it's only a bit underground, part of a split-level house, and the laundry room has the boiler, which keeps things mostly toasty.

Her house is a regular 2-story house with a deep basement that gets chilly. She's not sure exactly -- but possibly around 50-60 degrees. Time to head to The Book.

The Book = Worms Eat My Garbage by Mary Appelhof. She's the Worm Woman extraordinaire who first wrote her book in 1982 and has since been offering succor and support to budding vermiculturists around the world. Pretty much everything you need to know to get started is in The Book.

Back to The Book: Mary writes in The Book that redworms will live most comfortably -- and eat most rapidly -- in temps between 59-77 degrees F, although they can handle as low as 50 degrees F. Good news for my friend!

Mary also points out that temps above 85 degrees F may fry the worms. OK, she doesn't say fry, but the visual image scared you off testing the higher limit, right? Don't fry worms. No one will want to come to your house.

If you're not sure what the temp is in a particular location, you can buy a little doohickey from the hardware store. This one has a little sensor, a digital readout in either F or C degrees, and other options that I've never explored. It's pretty accurate, within a few degrees. (For example, I don't keep my house in the winter at 71. Really, I don't. I keep it at 67 during the day when I'm the only one here. The reason that the doohickey is showing a slightly higher temp may be due to the fact that I've got a fire roaring in the living room. Or it's just a few degrees off. Whatever you want to believe.)

24 February 2009

And other things

So it won't be all dahlias. I've already got daisies, monarda (burgundy and hot pink), echinacea, peonies, and countless other perennials to fill the beds by the house. I like blooms that have confidence, so aside from the daisies, my choices tend toward hot pink, orange and yellow.

For annuals, I always plant lots of nasturtium seeds in bare spots, along with portulaca, allysum, cosmos and marigolds. I'll be starting some of these seeds soon in my makeshift plant nursery in our bedroom. We put in floor to ceiling windows on the east wall during our renovation -- gives us a lovely view of the yard, the gardens (and our neighbors), plus it's perfect for seed starting. I did about 150 plants last year -- I'm going for 200 this year.

As for vegetables, I usually do tomatoes, zucchini, parsley, lettuce, kale, peppers, and beans/peas. The parsley and kale are for the guinea pigs, as were the peppers, which never blossomed. (I plant in raised beds -- will move the peppers to a sunnier spot this year. Wish me luck.)

This year, I'm cutting the tomato plants to one -- a grape tomato. A universal favorite that overflowed our harvesting bowls until late September. I might put in Red Brandywine, an heirloom, if I'm ambitious about making spaghetti sauce in the fall.

I'm also trying out cucumbers (burpless, hallelujah) and asparagus and potatos this year. Already got the ok from Pete (remember my obsessive spending last year?) to put up more raised beds, so I'm expanding a bit. I'd love to try wheat...

Rounding out the beds will be parsley again, peppers, kale, head lettuce, string beans, peas, and any seed packet I buy by May.

I usually buy seeds online -- being a somewhat obsessive person who likes to "garden" in the dead of winter. Favorite sites -- Whiteflower Farm, Park Seed, Peaceful Valley Farm & Garden Supply, Territorial Seed Company, and John Scheeper's Kitchen Garden Seeds.

Quick detour because the sun is shining

Got a question the other day from a friend that got my gardening juices (not leachate!) flowing. She wanted to know what I would be planting this year. Yowza. Those are dangerous words for me after a real Chicago winter.

The short answer is this: everything I can get my hands on. Sadly, that won't be as much as I planted last year (Pete and I discussed my obsessive gardening overspending last year, and the issue has been put to rest. It's so 2008 to overspend on gardening, right? Right? Hmmmm.)

To be more specific: fell in love with dahlias last year. They were blooming beautifully in my garden way into October. I know they're a little high maintenance for Chicago -- you have to dig up their tubers after the first frost, clean them off and hang them somewhere to overwinter. (I got the dig up and dust off part right -- but I think I left them on our back porch over the winter, and I'm thinking they're candidates for the outdoor composting bin at this mushy point.) However, I'm all for celebrating small success -- gorgeous blooms -- and working on past issues -- not remembering to hang the tubers before the first snow. So I'm back to dahlias.

Dahlias. Ahhhhhh. Some of the ones I ordered this year:

Dahlia Melody Allegro, from Whiteflower Farm


Dahlia Karma Corona, also from Whiteflower Farm


Dahlia Karma Fuchsiana, Whiteflower Farm


Dahlia Paso Doble, Whiteflower Farm


And just in case that isn't enough, also the Last Hurrah Collection of 5 tubers, from -- you guessed it -- Whiteflower Farms


I like Dahlias.

[Note to anyone concerned that this purchase of Dahlias might qualify as "obsessive gardening overspending," al la 2008. The answer to that is a resounding thank you to my parents, who sent me a lusciously large gift certificate to my favorite online nursery as a birthday gift. So ha!]

20 February 2009

For your reading pleasure

Found this in the NYT the other day -- Urban Composting: A New Can of Worms.

See, Pete -- I'm not crazy. Or, rather, I'm not the only crazy one.


Ray of Hope


There is one good thing I saw when I opened the bin -- the first working tray looked luscious.

Like this.

Aside from copious amounts of peanut shells -- virtually untouched -- everything else looked like damp soil. Damp, dark soil. Darker than the coir had been; definitely darker than the bedding in which the wigglers arrived. There was no more newspaper, no cardboard packaging, no recognizable half-decomposed bits o' organic. It's lovely.

Go ahead. Click on the picture -- view it up close.

And then make a note that all peanut shells go in the outdoor bin only. They spoil the picture.

Moist

I guess if I had given it much thought, I'd've realized how moist a vermicomposter can get. Organic waste is full of water -- vegetables and fruits contain a TON of water. But somehow I didn't think I'd put that much moisture into the bin.

Oops.

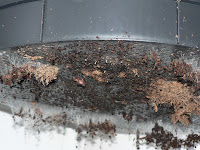
This is the base of the Can-O, and if you look closely, you can see a lot of moisture beading along the edges.

And this is a view of the base from a little further back. Yup. Those are dead worms.

Hmmmm.

It appears I neglected (or forgot or got lazy about or ignored) opening up the handy spigot to remove the excess liquid (the leachate, if you've been paying attention) to help regulate the moisture levels in the bin. And some of my faithful worms are drowned.

Dang.

Even worse, when I did put a handy Ikea container (formerly used for hairclips and crayons) under the spigot, I found out the worms, which seemed so round and vibrant, were now so... insubstantial... that they slid right out the spigot. Into my Ikea container that formerly held little girls' hairclips and crayons (although not usually at the same time).

Ick.

This could be a problem. Tune in tomorrow, when I discover exactly how many worms were involved in this atrocious wormicide.

A week later (if you ignore my posting dates)

A week later, Abby and I opened up the bin.

I already noticed a few rookie mistakes -- putting all the trays on top, even though the top two were empty. I guess I'm supposed to stack them to the side until I need them.

Mold. There's mold everywhere in the working tray. Wow. Have I mentioned I'm quite allergic to mold? This stuff didn't bother me much, but I'll admit, Abby and I kept our distance.

Some things look good -- I see worms in and among the ort. Some things smell good -- as in I don't smell anything. For good measure, I had Abby add some grapefruit remains -- those always smell nice (words that may come back to haunt me).

Another good sign -- but first let me explain something. There's the base -- nothing goes in the base except for excess liquid that drains down to it. Then there's the first working tray with the coir bedding, the worms, and the first layer of food with newspaper covering it. At some point in the last week, (not pictured), I also added some food and a newspaper cover to the second working tray. It seemed the right thing to do -- the first working tray seemed jam-packed with wormness.

Sooooo, the following picture is of the second working tray being lifted in the air by me while my trusty Abby takes the shot. If you look closely, you can see worms hanging through the mesh. This is a good sign! This means some worms are migrating up to the next level -- it works! (Yes, you can also see mold -- I'll have to check further on this, because it seems excessive.) But it's working! It's working!

[If you want to see the worms in all their close-up goodness, click on the pictures and they'll open up much, much bigger. It's up to you.]

19 February 2009

And so it begins


I had a bin. I had my worms. I had organic waste overflowing a fabulously aerated bin under my kitchen sink. I had a family used to collecting organic waste for outdoor composting. I had moistened bedding in the first working layer. Time to put it all together.

This picture shows the coir bedding in the bottom working tray (dark brown) with the lighter brown bedding that came with the worms, and the worms themselves (kind of pinkish -- the "red" part of the name does not seem to hold out so far).


This picture shows the bottom working tray with the wet newspaper on top. Underneath, I put a bin full of organic waste from the kitchen: banana peels, peanut shells, grapefruit rinds, coffee grounds & filter, egg shells, bread, shreddings from various vegetables, and possibly some fuff from the dryer. I put all of this is a thin layer right over the worms/bedding, and covered the whole mass with wet newspaper.

I'm not sure about the dryer fuff. I compost that all the time in my outdoor bin, but I don't know if worms will like it. Other things worm might like: cereal, cake, cheese*, lemon, onion peel (not the onion itself), pizza crust, potatoes, potato salad, tea bags, and all kinds of spoiled food from the refrigerator. Too much citrus could kill the worms; I'm also leery of dairy, like cheese*, for odor issues. Meat doesn't generally go in a home vermicomposter due to odor issues and also the possibility of attracting unwanted tenants (wanted tenants, I'll mention those as I find them).

For my husband and kids -- here's a list of what DOESN'T go in the bin: things that don't decompose (like rubber bands, staples, sponges or aluminum foil).

Also animal waste doesn't generally go in -- definitely not from cats and dogs. Guinea pigs, of which we have three, are a different matter. We use recycled paper nuggets for bedding for the guinea pigs, and this seems like a perfect "brown" material for the vermicompost -- and how cool to get even more use from this already recycled and peed upon material. Also, cavy (aka guinea pig) droppings are small and dry, and even when... wet... odorless. And these animals are vegetarians, which avoids the unwanted-tenants-attracted-by-meat-poop problem.

Although my favorite worm composting book, Worms Eat My Garbage, by Mary Appelhof, didn't specifically mention guinea pig droppings, I think they're ok to use. I googled "vermicomposting" and "guinea pig bedding" and generally got the thumbs up from other vermicomposting-people. I don't think I'll use it though -- I've got a bag of shredded financial documents already in line in the laundry room by the Can-O, and I'll go through that first.

Here's Tonks, cavy extraordinaire, in his (unwelcome) Christmas gift -- a harness and leash.

Bedding

Bedding for worms is thankfully not what I consider bedding. Bedding can be any shredded "brown" material like shredded newspaper or computer paper, coir, wood chips or peat moss. Just as with outdoor composting, a balance of green and brown material is necessary for proper decomposition -- also, and more importantly, a proper amount of brown material keeps the green material from getting stinky.

The Can-O-Worms comes with one block of coir, or coconut fiber. To loosen up the coir, I soaked it in a bucket full 3/4 with water. I left the paper wrapping on the block -- paper is prime food for worms. After about 15 minutes, the coir had become a brown mass of mush. I scooped up handfuls of coir, squeezed out excess water, and spread it on the cardboard packaging on the bottom of the working tray.

Different beddings have pros and cons. Shredded newspaper is easy to obtain, holds moisture well, and doesn't have an odor, but it can also become matted and thick easily. Machine-shredded computer paper is also easy to obtain but it doesn't hold moisture as well as newspaper. Coir is apparently a byproduct of the coconut industry in Sri Lanka, and the islands started exporting it as a substitute for peat moss as a way to handle disposal. However, knowing that coir has to travel long distance (I don't have the same information about my newspaper or computer paper) and seeing the cost, I'm not sure I'll use it again, even if the worms seem to love it.

How it works

Basically, you take the cardboard packaging, put it in the bottom of the legged base (so bedding doesn't fall through), fill the bottom level with bedding, pour the worms on top, put down some organic waste covered with carbon scraps, and voila, worm farm.

Eventually you can put food in the next level (as long as the bottom level is high enough with bedding so the worms can crawl up the levels), and the worms will travel to eat it. Once that level is full, you fill the next, etc., each level left behind giving a mixture of vermicast and vermicompost to use as you need. It's a rotating system, it's not that big (I can get my arms around it), and it's made of recycled plastic.

Sounds easy.

18 February 2009

Um, we're missing something

Aside from getting a vermicomposter (and there are many kinds), I also had to find worms. This is an easy task, but you need to get the right worms.

And to me, all worms look alike, right? My girls took insect investigation summer camps but although I've been a gardener for years, I don't look closely at the worms I find in my soil. Basically, there are tons of different earthworms, some of which are soil workers, and some of which are composting worms, who don't like living in soil but prefer heaps of organic matter. We love earthworms for everything they do in our soil -- especially those of us with heavy clay soil that needs an earthworm's tender aeration -- but they wouldn't do diddly in a heap of organic waste.

(Quick aside: worked on a conservation project at the Botanic Garden with a soil ecologist who told me the earthworms we so treasure in our soil aren't actually native to our country. At some point, they were brought over here, probably in an agriculture shipment as a stowaway. Who knew? Gardeners in this country act like the earthworm was always here and have a god-given right to infect our soil, blah blah -- I'm just glad they're here now.)

So I needed some composting worms -- red wigglers, redworms, stink worms or tiger worms (all referring to the very same beast). They're not something I could go outside to find. Luckily, there are worm supply farms all over the internet (you might say the internet is crawling with them, but I'm not partial to easy puns).

My supplier of choice was GardenWorms because they were one of the least expensive options with ready stock. I imagine that hunting for reg wigglers in a time other than the dead of winter might reveal more sites with stock to ship.

The worms arrived in a bag with some bedding. Usually the box will say "live" or "perishable," but our postal guy, Eric, was so freaked out by the combination of "GardenWorms" and "perishable" on my box that he rang the doorbell to hand me the package personally and to verify that I wouldn't be eating what was inside.

08 February 2009

Can-O-Worms


Oops, Christmas refers to this post, not the last. Being crafty in my composting marriedness, I inveigled my poor spouse to procure the bin. I sent him pictures from Amazon and my favorite composters site. He ignored me and purchased the Can-O-Worms.

The Can-O- Worms is considered to the most popular home-vermicomposting system in the US. You get a legged base with spigot, three trays, and a top. The spigot is for releasing the liquid (called leachate) that may drain from the composted organic waste -- this makes prime fertilizer for indoor plants. The Can-O-Worms is made with recycled plastic and comes packaged in cardboard that you then use in the Can -- nothing is wasted.

You can vermicompost in just about any plastic or wood container that allows aeration. Some people get Rubbermaid bins and drill holes in appropriate places -- this would be horizontal vermicomposting, since they'd be using the entire bin at the same time. With horizontal vermicomposting, there's time and mess with harvesting out the finished product, separating the worms, etc.

The Can-o-Worms is a vertical unit that supposedly makes harvesting and separating easier. Ostensibly, you start with the worms and the food in the bottom bin until it's full, then add food to the next up bin and the worms migrate up once the food is fully digested in the lower bin.

05 February 2009

Christmas

So I've enjoyed composting over the years. Perhaps more so than my family. After all, I'm the one who mostly takes out the trash, so I can tell how much less we're creating. I'm the one who is most in the kitchen, so I can tell that our trash no longer smells (unless there's uncooked meat/wrapping in the bin). I'm the one who treks out to the outdoor bin on a twice-weekly basis with an under-sink bin brimming with organic waste. And I'm the gardener who appreciates using free compost and almost-compost to fill raised beds for growing spring and summer vegetables.

But we live in Chicago; half the year (it feels like) our outdoor bin is covered in snow. Time for something new. Time to appreciate Chicago in all its cold wonderfulness and embrace the challenge of a true Chicago winter.

Time for worms.

01 February 2009

And there's location


I forgot to mention something that actually was quite important to Pete: location of the bins. I had reasonably assumed that locating the bin close to the house, making it convenient, would be a good thing. It was a good thing -- for the mice. In fact, it was a very good thing for the mice who found the bin and then found their way under my kitchen sink. I won't post a picture of what that area looked like, but trust me, it was no where as neat and tidy as the picture I am posting. (Note: I think the white-footed mouse is our culprit.)

I rapidly moved the bin to an edge of our property. I called the Village first though. Depending on where you live, your town/city/village may have views, codes or opinions on composting. The nice fellow who answered my call told me Glenview didn't have anything in writing, but he was all for the attempt.

And that's why the bin is shown far from the house in a picture posted earlier, and that's also why Pete had some hesitation about me bringing a bin indoors -- the vermicomposter. As you shall see, he was overcome by logic and cuteness.

(Jumping ahead -- I put the vermicomposter in the laundry room. That's on the same level as our family room, but no one would ever know it. My mom, who has a nose in a million, never made a comment when she was here a few weeks ago.)

15 January 2009

It turns out Patience

Patience makes the heart grow fonder. And the compost thicker.

I know you logged in to hear about worms, and worms you shall hear about. However, the path didn't start with worms. And composting is all about patience. That first composter -- the cold-composting bin -- actually did create compost. It was unfinished, as I could see clumps of composed (as opposed to decomposed) material, but it was usable.

When a squirrel ate through the bin, and Pete declared the white duct tape wasn't a highlight of the backyard, I went ahead and got him to buy me the tumbler. Tumbler composting is batch composting -- holding a mix of brown and green materials in a bin, then putting batches into the tumbler and, um, tumbling it for a few weeks until it's ready and you start with a new batch.

This tumbler is supposed to be different (hence the outrageous price): it's supposed to combine cold and tumbler composting in one unit. Unfortunately, I didn't add enough brown material to this composter, and the same squirr-tastrophe happened here, too.

(Note to self: heavy duty recycled plastic may look indestructible, but Chicago squirrels can chew through anything.)

In addition, I thought the claims were a little over the top and didn't bear out under practice. This really is a batch composter, which isn't my thing. So out it went.

10 January 2009

Three composters later,

Pete claims we haven't yet harvested usable compost, although it's 5 years, 3 composters, and pounds and pounds of organic trash stashed under our kitchen sink later.

Turns out, he's partially right. Composting can be very easy -- you can cold compost, which involves a minimum of effort. You basically dump your organic waste in a designated area (which has light and rain) and come back many months later to find composted material. There's no temperature-taking, no balancing of green and brown waste, no plunging your hands into the center of the mess to stir things up. That's how I started, and it's a slow process.

A really slow process.

And sometimes squirrels chew on the bin (especially if you dump in only green waste and forget to cover it with brown).

So I went and did the only thing a lazy composter could do -- I purchased another bin. A much more expensive bin. (I went about it in a smart way, though, showing the experience of a long-married woman: I convinced Pete to buy it for me for Mother's Day. He felt -- well, if not good about it, at least he felt in control of the purchase -- and I excitedly began reading about tumbler composting.)

05 January 2009

And then quite a bit later...

We moved to Glenview in 1998. I had been modestly gardening in the city for 2 years, but now I had a whole quarter acre to play with -- and because our house is tiny, I had almost the entire plot as a playground.

Old Lady Ill (yes, that was her name) had been a gardener too, but I didn't let that stop me. I pulled out her iris and her hens & chicks. I enlarged her back plot, removed some groundcover around a tree and made that into a garden, too. By the time I signed up for my first class at the Chicago Botanic Garden, I had convinced my husband to remove the overgrown hedges in the front of the house, removed squares of lawn for roses and coreopsis, and taught the girls that corn grows on a stalk, not in a grocery store.

But that first class at the CBG would be Pete's undoing, because that first class was all about composting. It was called "Mulch," but only the first 10 minutes was spent on that stuff you can buy in plastic bags at Home Depot. The rest of the discussion centered on making the gold at home. It turned out I had everything I needed to create plant food at home, except a hideously expensive, recycled plastic black composter that cost a mortgage to ship from my favorite Gardeners Supply Company.

01 January 2009

In the beginning...

A long time ago, I didn't like dirt, worms, gardening, noxious odors, or decaying material. I liked my carbon in paper form, neatly bound, preferably containing a beguiling story about horses and a young girl.

Then I went to law school. I had kids. I learned to appreciate the concrete world around me, not the fantasy world in a book. And then I found gardening books, and my nirvana was complete.

So the truth is I didn't set out to compost, much less compost with worms. After politely ignoring my mother's love of plants for 26 years, I began gardening in the tiny front court of our coach house off Addison, more as a way to fill the time before the beginning of law school than as a bona fide interest. A casual purchase of red salvia from a neighborhood Walgreens turned into using my brother's car during his honeymoon as a vehicle for plant purchase from farther afield. By the time I had grown my first sunflowers taller than Pete, I was hooked.